I had the immense pleasure of teaming up for a month-long collaboration with That Kentucky Witch for thirty days of sigil creation (part one and two). We had such immensely different approaches that I wanted to conclude the project with a bit of DIY and an interview with That Kentucky Witch just to get their perspective on it all.
Mortellus: So what would you say was the most enjoyable part of this project?
That Kentucky Witch: For me it’s about spontaneity. I work from the hip, from instinct. Focusing on the intent of the sigil, or in this case, the word, I begin to form an image in my mind and draw from that.
That’s pretty interesting since for me I tend to work with a more process oriented structure such as the magic square or witches wheel methods.
I loved the fact that you made me think outside my personal box as far as working with sigils.
I don’t know about that! I imagine I was the one in the box, and you opened the lid up a bit. So, now that this is all said and done, what were your top five sigils from this project, and which would you say was your least favorite – and why?
Top five are definitely Distort, Home, Sovereign, Eliminate, Locate is definitely my top. Least favorite – transmute. Why? It seems like it would be really hard to draw on a candle.
That’s funny because my least favorite was distort and I was so surprised by how many commented on it, while transmute was one of my favorites. In the end, my absolute favorite wound up being “Immune” – it was one of the ones where I really let loose and let spirit take the lead. It came to be a message of growing even when attacked, which can be about so much more than physical health, and a message about magical or even mental immunity. Any last thoughts?
If you want to try a little sigil DIY of your own, here’s my go to method, and look for some resources at the end.
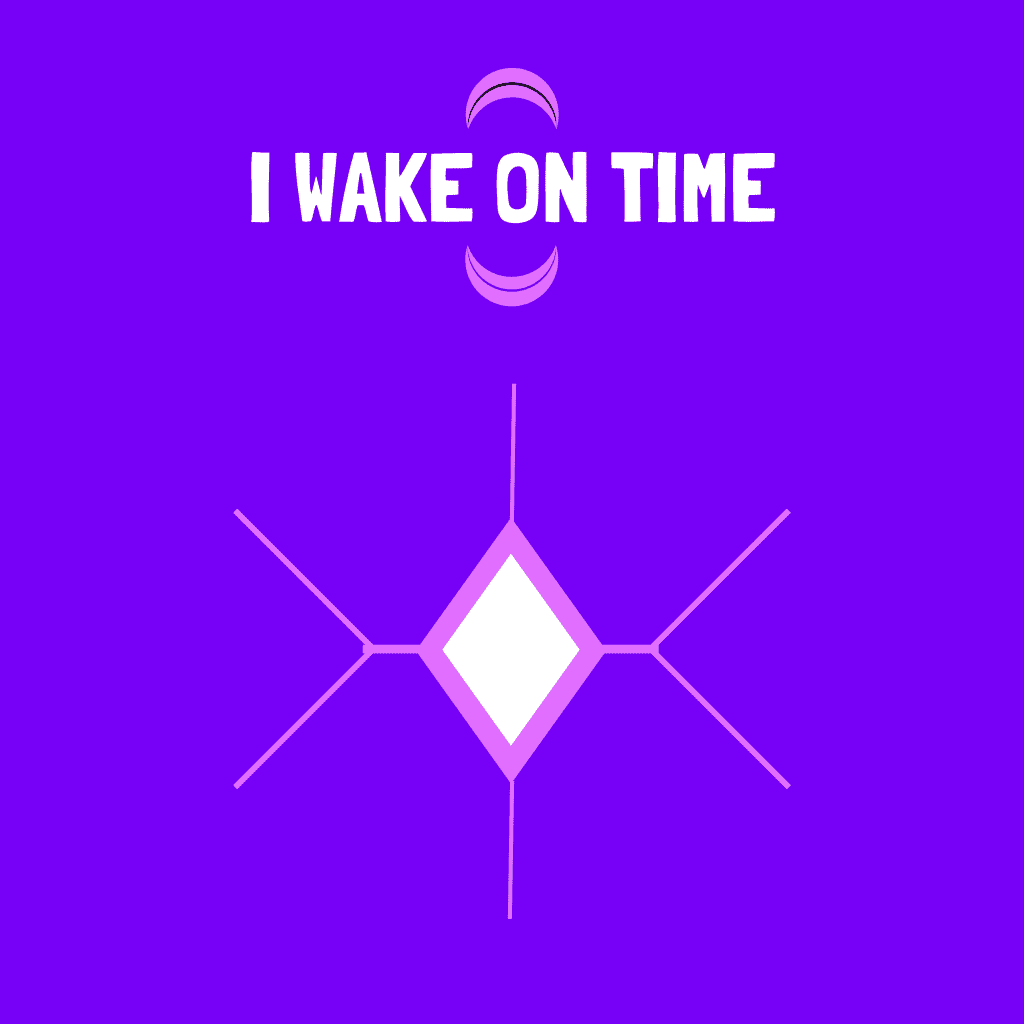
All Sigil work should start with some basics: What is your focus/purpose? You’ll need to start with either a word, phrase, or paragraph to make your intent known – heck, it could be an entire book. (I’ve done this, working my entire Book of Shadows into a sigil!) For the purpose of this DIY I’m going to show a sigil I made for my oldest child when they were struggling with getting up on time for the bus.
I began with a very simple phrase: “I wake on time.” What’s important here is that you really think about your intent and work with it in a physical and tactile way. Work with your hands, write it down, draw it out.
I would like to note that I have avoided using negatives in this sentence (Can’t, Won’t, Shouldn’t, and so on). The idea is that magically, such words are ignored. For example, “I will not miss the bus” becomes drastically different with the elimination of the word ‘not,’ changing the meaning of my symbol to very much the opposite of what I intended. It is also generally advisable to avoid the word ‘will,’ as it moves the intention and timeline of your magic into the future rather than keeping it in the now.
Be certain to have very clear intentions; the phrase I’ve begun with here works well because it covers lots of basics and is very to the point.
The next step of the process is to take our, we take our word/phrase/etc and begin breaking it down. Removing all vowels as they are magically unnecessary, and removing duplicate letters. This left me with: WKNTM – which is my starting point for the next part of the process.
Reducing the phrase into its base components
Taking the remaining letters WKNTM, having eliminated duplications and vowels, I break them down into their most basic shapes from which to build the design. For this particular sigil we have the vertical line from the M, T, K, and N. The left and right angles from the M, W, V, K, and N. The V shape from the K, W, and M. And lastly, the horizontal line of the T.
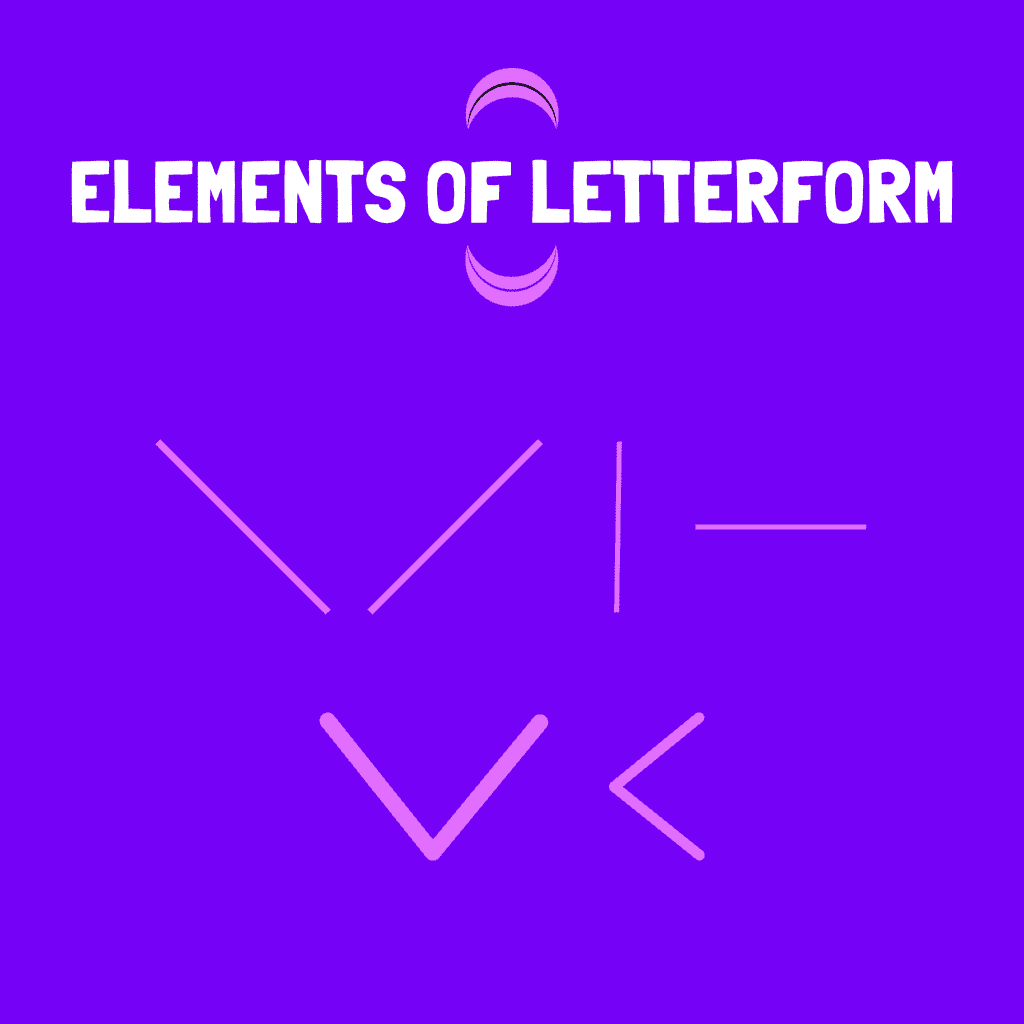
From those lines, you begin your sketches. Doodling and reworking until you get a combination of shapes that speaks to you magically, until you’ve lost all sense of the process, and steps along the way.
In the end, this was the design that I settled on:
End steps
After you’ve reached a shape that you wish to move forward with, all it needs is to be charged with energy. You can choose to do this a great many ways, by inscribing it on an altar candle, by placing your sketches under the full moon, by asking the Gods to imbue it with your intention – and more! At this point, all of your original sketches, letters, phrases, and scratch pages of doodles should be tucked away somewhere to be forgotten. Best that you forget the words you used and all the steps along the way – they work better that way! To this end, I keep a book specifically for the purpose of tucking away pages such as these, which I only open to add new pages to the back.
Putting your sigil to work can mean a lot of things. You might draw them on your skin, inscribe candles, make wall art of them, like I often do – make digital art of them, or in the case of our example sigil – embroider it on a pillowcase as a gift for the new school year.
Good luck out there with your sigil projects, tag me in some, and I hope you enjoyed this collaboration between myself and That Kentucky Witch as much as I did!
Helpful Sigil Making Resources:
Practical Sigil Making, by Frater U.D.
Sigil Witchery, by Laura Tempest Zakroff
The Fundamental Book of Sigil Magick, by K.P.Theodore